
In this article we’ll give you a general overview into Google Tag Manager. We will be talking about what Google Tag Manager is, how it works and how to use Google Tag Manager to effectively create and manage tracking tags to collect data and improve your digital marketing campaigns.
In this guide we aim to provide you with detailed information on what Google Tag Manager is and why it is important for collecting data that can be used for improving marketing campaigns as well as driving more traffic to your website.
Google Tag Manager – An Introduction to Tracking Tags
First and foremost let’s start with what a tag is. Within the context of web analytics, tag can be described as a snippet of Javascript code. These tags allow tracking user activity and collecting data. By utilizing these tracking tags you can enrich data sent to your Google Analytics account. As an additional note, it is important to mention that these tags are very different from tags in the context of programming language, HTML. This is because these tags to which we are referring are used for analytics and marketing purposes. Meanwhile tags in HTML define the certain elements in a webpage such as headings, links etc.
Many websites that include multiple tags that serve different purposes, mainly for analytics and marketing. In this post we will be focusing on tracking tags that are used to collect data from website visitors that have interacted with your website. These tags are specifically used for tracking user behavior in a specific button or banner on your web page, or, alternatively you can implement a tag for all the pages on your website depending on your goal.
By effectively utilizing and integrating these tracking tags you can get more accurate and comprehensive data that will allow you to optimize any aspect of your website. In order to do this you can add triggers to your tracking tags. By adding a trigger to your tag, you can arrange when your tag needs to collect data, and by adding a variable you can determine the circumstances under which it will be activated. Let’s continue with the functionality and the definition of tags.
To continue with the tags, we can give an example on how you can use them, you can create a tag and adjust it so that it would be triggered any time a visitor submits a contact form or whenever a user subscribes to your newsletter and that data would appear in Google Analytics. Alternatively, with Google Tag Manager you can create a custom HTML Tag to collect data for specific marketing campaigns. As a result of this, you can measure the success of certain aspects of your website like specific buttons and banners and conduct A/b testing to optimize website usage both for users and your own website.

Now let’s talk about Google Tag Manager and how it makes it very easy to manage all the tags that you may want to integrate to your website. In the previous times, these tags that are used for tracking were created and manually added to websites one by one, individually, mostly by developers. However, manually adding these tags would be very time consuming and as the number of tags increases it would become much more complicated to manage and track them. This is because a high number of tags would be implemented in order to gather for the collection of specific data and for many different elements that may exist in a website. This is where Google Tag Manager comes to play. Google Tag Manager is a tag management system that allows website owners to create, update, monitor and manage each of these tags from one place only without having to manually add each of them seperately them to the backend of your website. Google Tag Manager automatically codes these tags for you and you will not need to write a code each time you create a tag. More importantly, you can gather much more accurate data and manage them efficiently using Google Tag Manager as it makes it possible to create and monitor them from its interface.
Installing Google Tag Manager on a WordPress Website
Account Setup
Enter tagmanager.google.com
> Click Create Account
> Enter Account Name: You can write down the name of your website
> Choose Country
To continue write down your website’s address to the Container name
> Choose Web and Continue
> Tick the Data Processing Terms and click the “Yes” button on the top right.
Now you will see a screen that shows you the Google Tag Manager Code. Open a new tab and enter your website.
Open WordPress Panel and click Plugins > Add New
Search for WPCode Plugin and install the plugin. After that activate the plugin and you will see Code Snippets in the sidebar. Move your mouse to Code Snippets and click Header & Footer. Now get back to Google Tag Manager and copy the <head> section of the GTM code and paste it in the Header part of your WordPress Web site. Similarly head back to Tag Manager and copy the code in the <body> tag and paste it in the Footer section in WPCode, then click Save Changes.
After completing these steps you can confirm having succeeded in installing Tag Manager by entering your website. To do this click Inspect > CTRL + F and search for googletagmanager and you will see that google tag manager code with your container ID.
First Look at Google Tag Manager: Tags, Triggers and Variables
As we previously explained tags allow you to collect information about user behavior. Here in the Google Tag Manager Container you can add or edit new tags,view all the changes you have made recently and keep track of all the tags that you have created for your website. In the Workspace section you will be doing most of the processes related to tag management.
You can create a tag by clicking New Tag. You can name your Tag so that you can keep better track of the tags that you have created. From Tag Configuration you can choose a tag type. There is a list of tag types inherent in Google Tag Manager but you can also choose Custom HTML Tag as a tag type if it will suit your needs better. After you have configured your tag you can add a trigger here. Triggers are the conditions determining when a tag will fire and Tags will fire when an event happens on your web page. In this way you can get specific information when a user clicks a specific banner, or a button, or if he chooses to scroll down. Triggers can also be adjusted when a user subscribes to your newsletters or if he makes a purchase. In the left section, you can specifically view Tags and Triggers.

There is where you can view variables. Variables are placeholders for values you define. They are populated when a code is run on your website, or mobile app. This means that variables will capture specific data from the user’s behavior when he visits your web site and these data will be passed to your tags. Variables are used in tags as well as in triggers. In triggers you can use a variable to create filters that would specify when a tag will fire. On the other hand, in tags, variables help you capture dynamic values.
Google Tag Manager provides you with a set of built-in, default variables. You can see them here and if you click Configure you have many more built-in variables that you can add to your workspace and there are also custom variables that you can create yourself. We’ll explain variables more in detail in our following videos.
In the folders section to make managing your tags easier this is because you can keep your tags, triggers and variables in separate folders. This way you can reach them from one folder only and it’ll be much easier to monitor them.
After you have completed creating your tag you can preview the changes made in your container. To do that hit Preview, and then connect, open tagassistant tab and you will see that in the Tags Section Google Analytics Tag is fired. You can then close the tab and then you can submit your container. Here you can give it a name and add description. And then publish. Each time you publish your container a new version of a container will be created and it will be added to the Versions section at the top. You can view your published containers here. This is where your published containers will be shown. When you click your Live version you can see all the details about the container you’ve just published.
And In the Admin section you can view Container Activity, Import or Export Containers. And on the left you can make changes in the Account settings, see Account Activity. You can also manage container permissions in User Management. In this way you can add users, or user groups and grant permissions to mail addresses for them to only view or edit containers.

How to Link Google Analytics 4 to a Google Tag Manager Manager Account.
We’ll show you step by step how to add Google Analytics 4 to your Google Tag Manager Container. As a first step let’s open our container and click New Tag. Let’s name our tag Google Analytics 4 (GA4) and click Tag Configuration, and then choose GA4 Configuration.
Now, we’ll need our Measurement ID for Google Analytics 4. To obtain our Google Analytics Measurement ID Let’s open a new tab and open our Google Analytics Account. Click Admin on the bottom left and then click Data Streams, choose your website and copy MEASUREMENT ID. Now let’s head back to Tag Manager. We can now paste our Google Analytics 4 Measurement ID here and add Trigger, choose All Pages and then Save. Now we can click submit, and then Publish our container.
Now in order to test whether our GA4 tag works, we get back to our Analytics Tab. Click Reports on the menu on the left, and then click Realtime.
Now Let’s open our website from another browser. Scroll down, click some of the blog posts, search for some terms and head back to the Google Analytics Realtime Overview to see whether all these interactions appear. Now we can see that our Google Analytics 4 Tag is working properly as it collects data from visitor’s interactions on our website.

Google Tag Manager – Creating Custom Variables
We’ll now be focusing on how to create custom variables. Now as we previously mentioned variables catch data whenever a visitor interacts within your website and you can adjust the kind of variable you want to pass information to your tag. By this way you can gather data on specific situations and conduct a/b testing to improve features of your website.
Now there are two kinds of variables in Google Tag Manager, Built-in Variables and Custom Variables. Let’s click Variables on the left, you will see that There is written Built-in Variables that goes on as Click Classes, Click Element, Click Target, URL, ID etc. Now if you can click configure and add other Built-in Variables among many options here. However, Google Tag Manager also allows you to create your own variable. To create a user-defined variable, scroll down and you will see the User-Defined Variables section at the bottom. Click “New”, here I will show you how to create a custom variable. In our custom variable we’ll learn whenever a person clicks on the “Author” link on our website. In order to do that let’s name our variable “Author” and then click Variable Configuration, here we’ll “Custom JavaScript” as our variable type. Now you may need help from developers when you need to write your own custom variable if you are not familiar with writing your own code. However, we can use ChatGPT to help us with attaining the code we do need.

How to Add Author Name as Writing JavaScript Variable
First of all let’s hit the blog post of our page to see it’s class. To do that select the author name and click Inspect. We see that we can use ‘author-name’ for its class.
We can use the code below:
function() {
    return document.querySelector('.author-name').innerText;
}
Then let’s copy this code and follow the next steps:
- Head back to Google Tag Manager
- Click Variables
- Scroll Down and click ‘New’ in User-Defined Variables section
- Rename Untitled Variable as “Author Name”
- Click Variable Configuration
- Choose Custom JavaScript
- Paste our code and then save

Now let’s save and scroll up, and let’s click Preview and test our variable, click Connect. Now open our website and select a random blog post and click on the author, here it is named ‘Alice Sky’, Tag assistant on the bottom right informs us that there is debug information for this page that we can view on Tag Assistant so let’s switch to Tag Assistant Window. On the left side of our tag assistant we can see our engagements made on our preview mode. As we see we enter our homepage first and then there is the blog post we have clicked, and finally we can see information about the writer class we have just clicked.
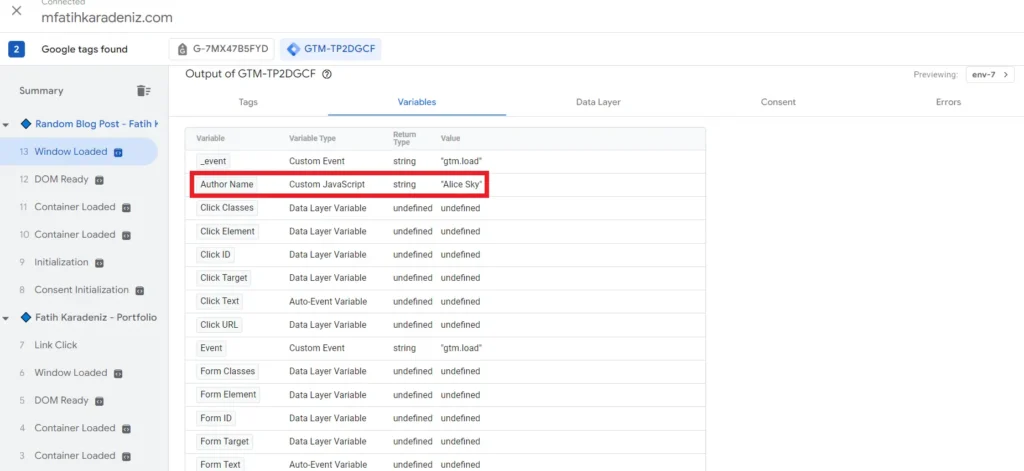
Now Click on the Windows Loaded on it and click Variables, we can see that our variable is working as intended as it provides us information and we see that Variable Name is “Author” as we named it, and the variable type is “Custom JavaScript” with its value as the author name.
Creating a TimeStamp for Each Clicks via Google Tag Manager Custom JavaScript Feature
We have already explained the Custom Javascript Feature in Google Tag Manager. We can find it when we hit Variables and then scroll down. We’ll see here that we previously added these variable which we have created with JavaScript code as it states the type as Custom JavaScript. Now because Google Tag Manager itself is written as JavaScript code, each of these built-in variables are javascript codes. However, we might like to add custom JavaScript Codes for specific purposes that may not be inherent in Google Tag Manager. To give an example we will implement a Custom JavaScript code that will give us a timestamp for each clicks. To attain such a code you can use ChatGPT like in this example it’s given me the following code:
function() {
  var now = new Date();
  var year = now.getFullYear();
  var month = ('0' + (now.getMonth() + 1)).slice(-2);
  var day = ('0' + now.getDate()).slice(-2);
  var hour = ('0' + now.getHours() % 12).slice(-2);
  var minutes = ('0' + now.getMinutes()).slice(-2);
  var seconds = ('0' + now.getSeconds()).slice(-2);
  var ampm = now.getHours() >= 12 ? 'PM' : 'AM';
  var timezone = Intl.DateTimeFormat().resolvedOptions().timeZone;
  return year + '-' + month + '-' + day + ' ' + hour + ':' + minutes + ':' + seconds + ' ' + ampm + ' ' + timezone;
}
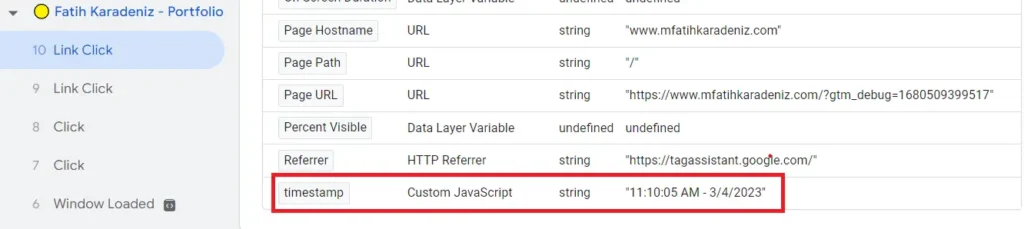
And Hit new to create a new variable, configure it, select Custom JavaScript option and then paste our code here. Name it and then Save. Now let’s preview and click a random post and then head back to tagasssistant, let’s click at the Window Loaded tab and hit Variables. Scroll down and we’ll see here that our Variable Timestamp states the exact date, hour, minute and second. With Custom JavaScript feature we can add any type of variable for our tags and view it.
Tracking Button Clicks Using Google Tag Manager
Now that we have explained what variables are and how to create custom variables. We will now talk about click button tracking. By using Google Tag Manager you can track clicks made on specific buttons on your page. You can use and interpret the data obtained via Google Tag Manager to improve your website’s crucial aspects such as buttons leading to your social media pages, or specific web pages that receive the most or the least amount of clicks.
Let’s open the homepage of our website, for a first step let’s create our tag to track the clicks made on the LinkedIn button the left side. This is my personal LinkedIn button, we’ll create a tag and a trigger to track clicks made on this banner
> Let’s open Tag Manager.
> Click on the New Tag, Let’s name it,
> Choose Tag Configuration as Google Analytics: GA4 Event
> Choose Google Analytics 4 and name our event as “sidebar”
> Click on the Event Parameters and let’s add a row first as {{Page Path}}
> Click Triggers and ‘+’ sign on the top right
> Coose Just Links and then Some Link Clicks,
Now we’ll need to add our LinkedIn button here but we might not know everything about certain buttons on our web pages, so in order to be extra sure I am going to preview it in a new tab, so let’s head to a new tab and open tag manager and click on the Preview button and connect. Open the debug window and let’s click the LinkedIn button, and head back to tagassistant, click continue and let’s click “Link Click” on the left and open Variables. We’ll see here all the information about LinkedIn button like Click ID, Click Text etc. although currently it’s not here but we’ve made sure that our Form URL is LinkedIn link here so let’s copy this and head back to the first tag manager window, Now we will choose Click URL and paste our link and then Save, and then save our Tag. Now we are ready to test it so hit Preview and Connect and right away click LinkedIn button on the sidebar and head back to tagassistant tab. On the summary we see that our “LinkedIn button” Tag has been fired and when we click on it we can see the details.
You may also want to see my post page load speed discrepancies
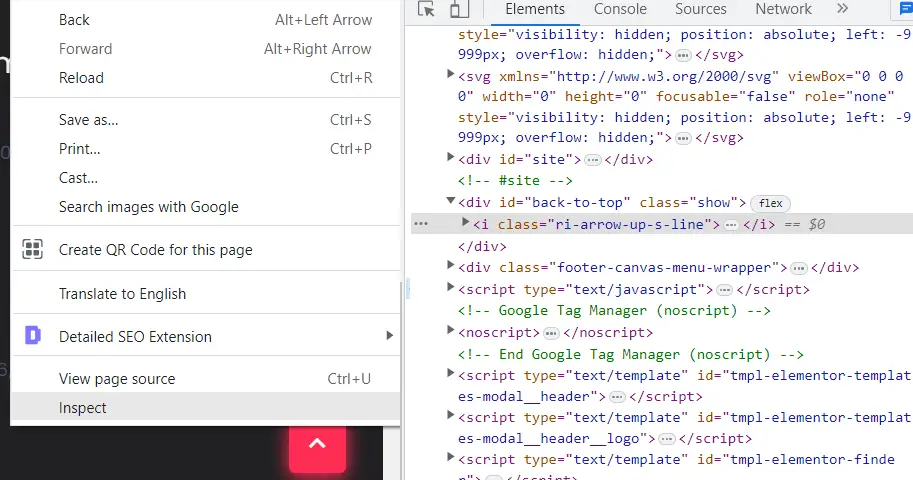
Now let’s try a different button for tracking clicks. Now when we scroll down there is this button on the bottom right that becomes visible when we scroll down and when we click on it it will automatically scroll up to the top of the page. Now if we want to track whether scroll up button is used by the visitors we can add a tag just for this purpose. Now this may be confusing for us to add so we can use something different than Click URL when we are setting up our trigger. So let’s click Inspect on the to the top button and copy its class ‘ri-arrow-up-s-line’ .Now head back to Google Tag Manager and create a new tag. Name our tag as “To the top button” and select tag configuration as GA4 Event, and then Google Analytics 4, event name as to the top. Let’s create a new trigger, name it as to the top and choose Just Links and then Some Links. Now we can choose Click Classes here and paste it ‘ri-arrow-up-s-line’ and then save our trigger, and then save our tag and hit Preview, connect and open our debug window. Let’s open a random post, and Now let’s scroll down, move the tag assistant tab and hit the button on the top right. Head back to the tagassistant tab, we see in the summary that our “To the button” tag has been fired and we can specifically on which page it has been fired as it we see it below the blog post’s Link Click section it has been fired and not on the homepage.

To sum it up, we can say that on Google Tag Manager you can create tags that will help you collect data on whether specific buttons on your web pages get clicked, and if they do so, you can learn from where people are being led on to click such buttons. We have shown you how to add tags that help you track button clicks and next we will explain how you can track forms in contact pages and you will learn how to create tags to gather information about your forms when people submit them.
Tracking Form Submissions in Google Tag Manager
We’ll be focusing on tracking form submissions that you would have on your website for people to communicate with you. First of let’s start with GTM’s built-in Form Submission trigger. Click Triggers and then create New, name it Form Submission and configure, select Form Submission and Save. Now create a new tag name it Form Submission and select Google Analytics: GA4 Event , choose Google Analytics 4 and name it form submissions and add the trigger Form Submissions we’ve created and then Save. Let’s hit Preview and test our tag. Now we can fill up all these information and hit Submit and we’ll see that our tag will get fired. However, even if you have not filled these information and clicked Submit, we can see in the tagassistant tab that our Tag has been fired. Due to this, our data may not be entirely accurate because even if a user accidentally hits on the Submit button it’ll still be added to our data, which would then be contaminated.. To prevent this we can set a tag that would get fired only when a form is successfully submitted. In order to do that..
Let’s create tag and name it “Form Submissions” configure it as GA4 Event and name it “ga4”, and then add a trigger, create a new one from top right configure it as Element Visibility, choose CSS Selector and let’s head back to see our Submit button’s Element ID. Fill up the information and then submit. Select the text and right click, inspect. Copy the class “wpcf7-response-output” and let’s first put “.” to specify its class so that it’ll be like this: “.wpcf7-response-output” and then paste this to Element ID as “.wpcf7-response-output”. Now fill “Every time an element appears on screen and then opt Some Visibility Events, then Choose Click Text and Contains, add our successful submission message here “Thank you for your message. It has been sent.” and then save.

Let’s preview our tag, just click Submit without filling in anything and let’s see if our tag has been fired. We’ll see that it has not been fired so it is a good thing that this tag doesn’t fire when someone wrongfully or accidentally hits the Submit button. Now head back to the debug tab and now fill out the form and then Submit. Now let’s see if our tag is fired. We’ll see that our tag successfully has fired. In this way we can get more accurate data as our tag will get fired only when a submission form is successfully sent.
Now Let’s submit our container and test whether our newly created tag works. Open our Google Analytics tab, from the left click Reports and choose Realtime. Now let’s open a new browser and visit our website, fill out the information in the contact form and hit Submit. Now head back to Analytics Realtime Reports. (Refresh if necessary) and when we scroll down we’ll see in the bottom left in “Event count by Event name” our tag “Event Count” on how many times it has been activated. In this way we can measure how many times users have successfully filled out the Contact Form on our website.
Google Tag Manager Custom HTML – Adding Structured Data Using GTM
We’ll now show you how to use Custom HTML feature in the Tag Manager and we’ll be creating our structured data and implementing its code on our web page using Custom HTML feature of Google Tag Manager so let’s start.
First of all let’s explain what Custom HTML feature is. Google Tag Manager allows you to implement HTML elements into your web pages. In this way you can add HTML Tag using Google Tag Manager’s Custom HTML feature and it’ll be no different from manually adding it into your website. However, you can manage your HTML Codes in a more organized way, as you can manage your HTML Tags via specific folders that you create and plan.
Now we can exemplify Custom HTML Feature by adding structured data to our web pages. To do that you can copy your FAQ Schema Markup Code that you’ve created and then head back to Google Tag Manager and create a new tag, name it as FAQ Structured Data, choose Tag Configuration and Custom HTML Tag and paste the code here and click to add a Trigger, add a new one from top right, name it “structured data example” and to configure it choose “Page View”, and then “Some Page Views”
Then choose Page URL, and then Equals, and copy paste the URL that we’d like to add our structured data to, and then save. Save again and Submit, Publish.
To test this tag. Open your website and go to the blog post to which you have added HTML Code for FAQ Schema. Copy the URL and open Rich Results Test. Let’s test the URL. Now you can see here that our FAQ’s been added.
Other Articles
