
Hi everyone! In this article, I will guide you through a step-by-step tutorial on setting up a tagging solution to collect IP addresses with Google Tag Manager and integrating the gathered data into Google Analytics 4 Reports. In this way, you can collect and improve the accuracy of your data collection of your website, prevent ad fraud or similar practices, and enhance your understanding of user behaviour.
However, before diving into the details, it’s crucial to address the legal and ethical considerations that come with collecting IP addresses. As we delve into the intricacies of setting up Google Tag Manager for IP address collection, I want to ensure that you approach this with a full understanding of your responsibilities and the potential impact on user privacy.
Disclaimer: Privacy Laws and Data Collection
Before delving into the tutorial on collecting IP addresses with Google Tag Manager for Google Analytics 4 Reports, it is crucial to address the legal implications and privacy considerations associated with such data collection. The collection of personal information, including IP addresses, is subject to various privacy laws and regulations around the world.
It is imperative to note that the collection of IP addresses may be regulated by privacy laws in different countries and regions. As a website owner or administrator, it is your responsibility to be aware of and comply with the privacy laws applicable to your jurisdiction and the jurisdictions of your website visitors.
Importance of Consent Banner
One key aspect of compliance involves obtaining explicit consent from users before collecting their IP addresses or any other personally identifiable information. Consider implementing a clear and comprehensive consent banner on your website to inform users about the data collection practices and seek their consent. This ensures transparency and aligns with privacy best practices.
Remember that the language and design of your consent banner may vary based on legal requirements in different regions.
Your Responsibility
Please be aware that failure to comply with privacy laws may result in legal consequences, including fines and penalties. The information provided in this tutorial is for educational purposes only, and implementing the described setup is at your own risk. By proceeding with the setup described in this tutorial, you acknowledge and accept the responsibility for ensuring legal compliance in your specific context. This includes understanding the legal repercussions and ensuring that your website’s data collection practices adhere to the privacy laws applicable to your jurisdiction.
Getting Started with Google Tag Manager
Before proceeding with the tutorial on collecting IP addresses with Google Tag Manager for Google Analytics 4 Reports, ensure that you have already set up Google Tag Manager and Google Analytics 4 on your website. If you haven’t done this yet, you can follow this guide on How to Use Google Tag Manager.
If everything is ready you can follow the steps below:
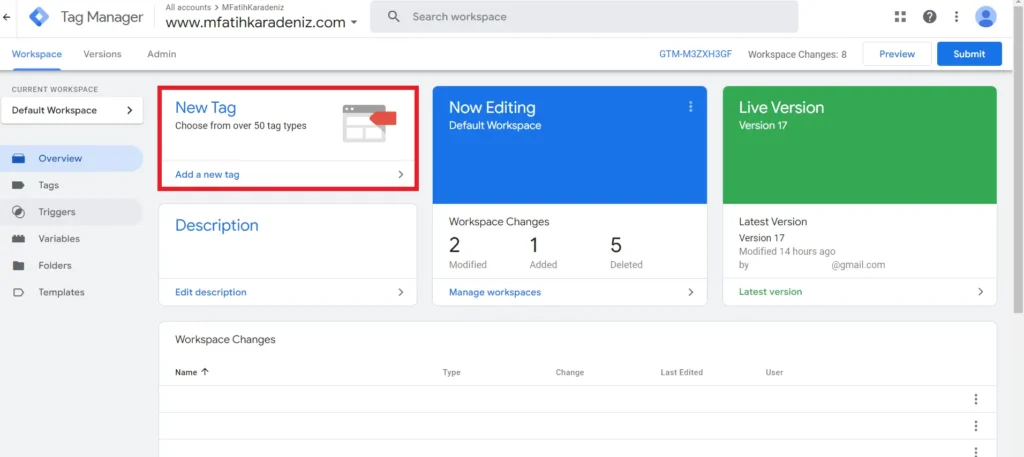
- Open Google Tag Manager
- Enter tagmanager.google.com and choose your account.
- Select New Tag to create a new tag.
- Configurating Our Tag
- Let’s first name our tag as “IP Address”
- Select Tag Configuration and choose Custom HTML and paste code below:
<script>
(function getIpAddress() {
  fetch('https://api.ipify.org')
    .then(function(response) {
      return response.text();
    })
    .then(function(ip) {
      window.dataLayer = window.dataLayer || [];
      window.dataLayer.push({
        event: 'IPAddressEvent',
        IPAddress: ip
      });
    });
})();
</script>
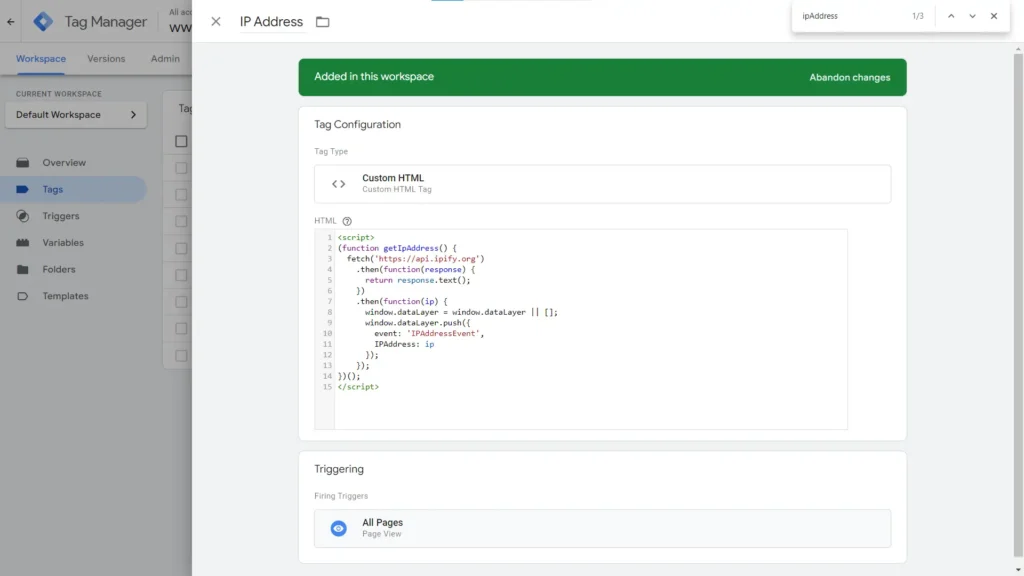
3. Trigger Configuration
- Now we can proceed with setting a trigger. In this article I will choose All Pages trigger to collect IPs from all pages. However, if you mean to collect IP information for specific pages only you can create a custom Page View trigger and set the variables according to your wishes.
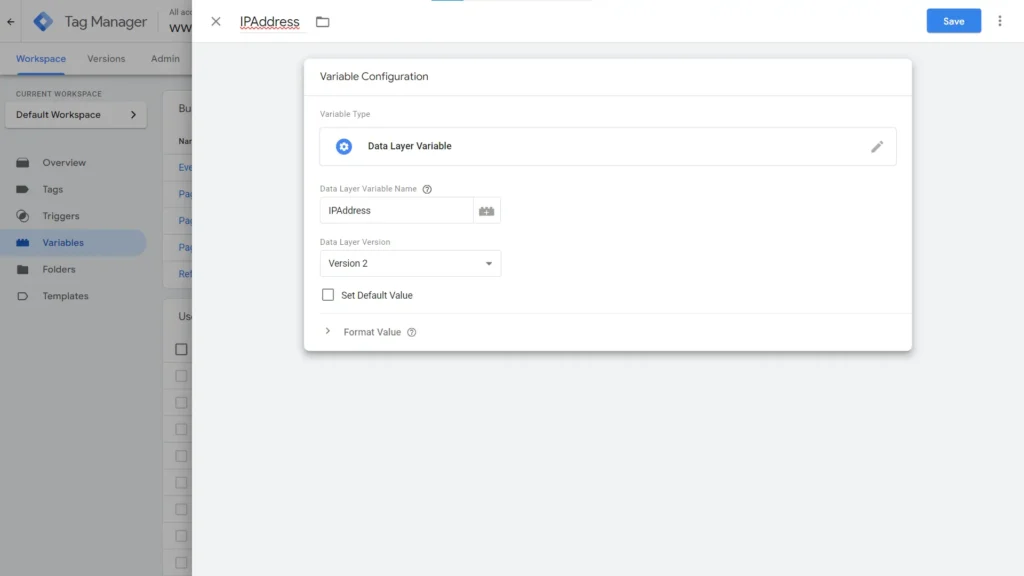
Creating a Custom Variable for IP Address Tracking
Now that we have created our tag that fetches the public IP address of the user from ‘https://api.ipify.org’ using the Fetch API, and then push this information into the Google Tag Manager data layer as a custom event (‘IPAddressEvent’) along with the retrieved IP address we can create a custom variable for it. In order to do that:
- Click Variables from the left sidebar of Google Tag Manager
- Scroll down to create a new User-Defined Variables
- Click ‘New’
- Name our Variable as IPAddress
- Click Variable Configuration
- Choose Data Layer Variable
- Name the Data Layer Variable Name as IPAddress and save
Create an IP Address GA4 Event
Having created our tag, let’s proceed with creating a GA4 Event to transfer data as an event to the GA4. Let’s first create a new tag and configure according to the steps below:
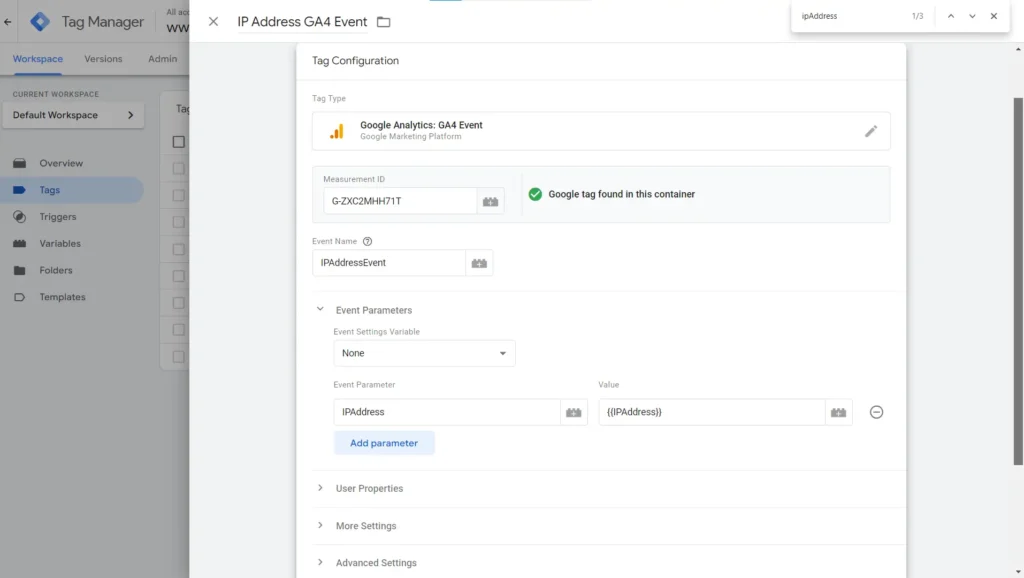
Create a new GA4 Event Tag
- Name our tag as “IP Address GA4 Event”
- Click Tag Configuration and choose “Google Analytics: GA4 Event”
- Paste your Google Analytics 4 Measurement ID (If you do not know your GA4 Measurement ID you can learn it by entering analytics.google.com, click Admin > Data Streams > Choose Your Property > Copy Measurement ID)
- Name the Event Name as “IPAddressEvent”
- Hit and Expand on Event Parameters below
- Click ‘Add parameter’
- Name the Event Parameter as ‘IPAddress’
- Name the Value as ‘{{IPAddress}}’
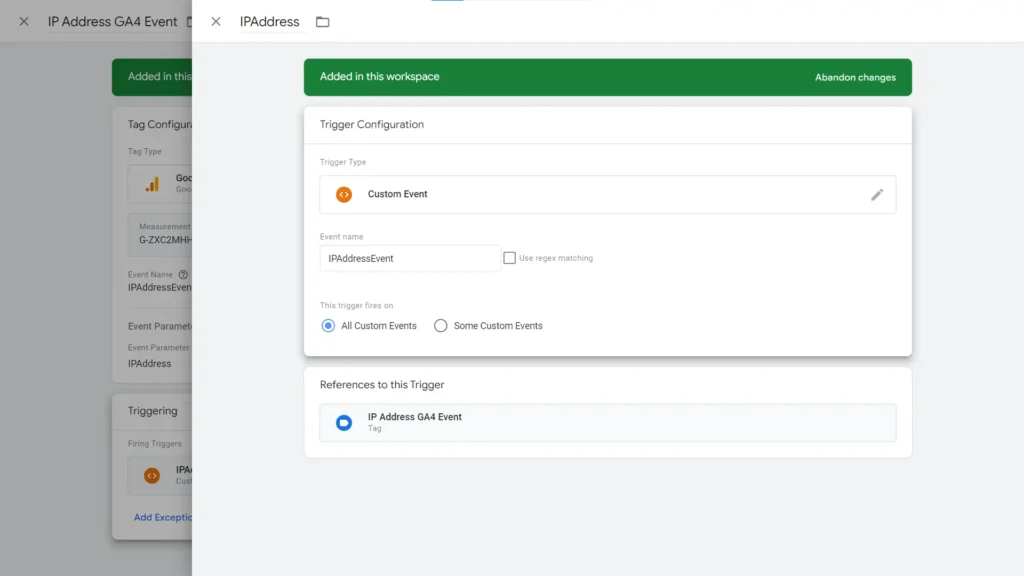
Trigger Configuration
- Let’s now click Triggering
- Click ‘+’ sign at the top right to create a new trigger
- We can name the trigger as ‘IPAddress Trigger’
- Click Trigger Configuration and select Custom Event
- Paste “IPAddressEvent” under the Event Name and save all
How to Validate Tag Firing Accuracy?
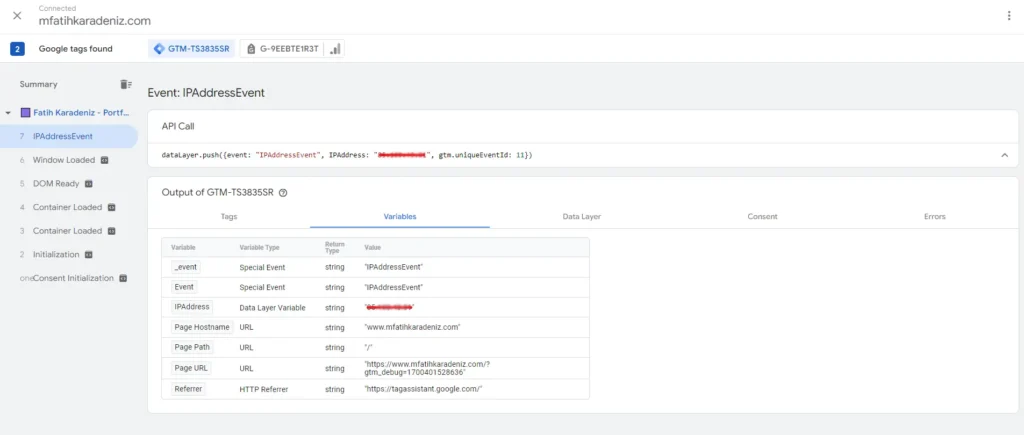
Up to this point, we have succesfully created our tags and now we test them to see if they fire as intended. To do that let’s first use Google Tag Manager’s Preview Mode as well as Google Analytics’s Real Time reporting feature but let’s start with the former.
Click Preview from the Google Tag Manager and connect to your website. On the Tag Assistant tab we can see which tags got fired. We can also see the IPAddressEvent that we have set-up. In the Variables section of the IPAddressEvent we can see our own IP Address value from the IPAddress Data Layer Variable
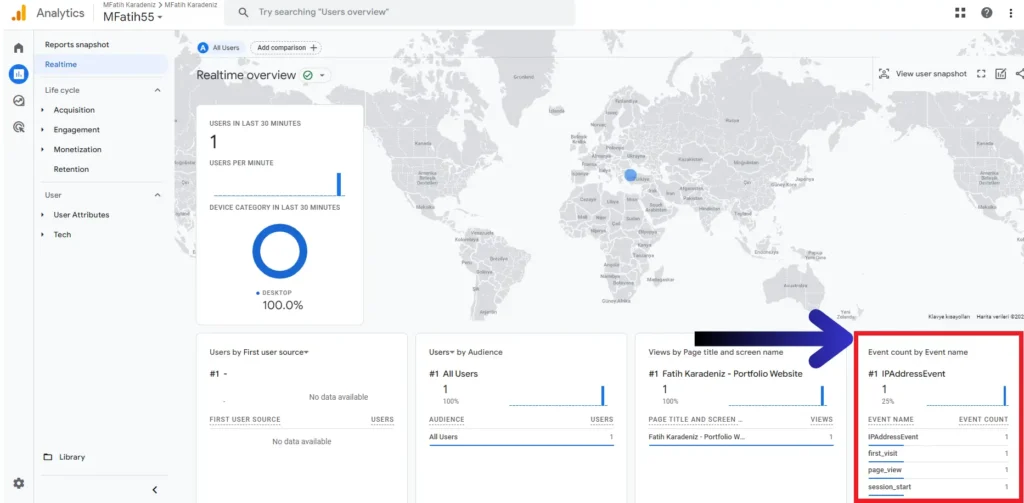
When we enter Google Analytics’s Real Time Reports by navigating in Google Analytics’s Reports > Realtime we can see that in the last 30 minutes IPAddressEvent has fired correctly.
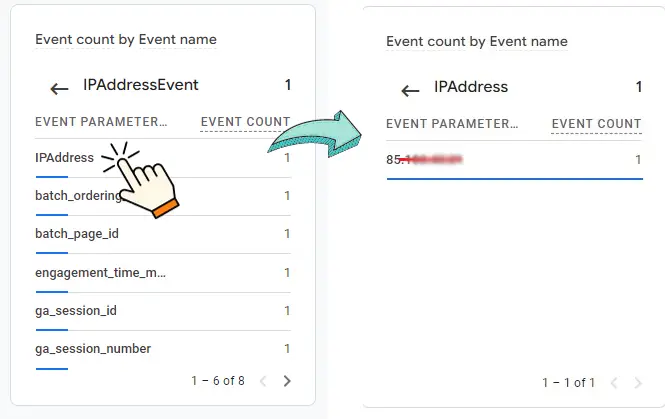
By clicking into the IPAddressEvent you can view all the event parameters of this event. When we further click into the IPAddress parameter that we’ve manually added we can see the IP Address as a value.
Now that we’ve validated our tags firing we can finally submit our container in the Google Tag Manager by clicking ‘Submit’ located beside the ‘Preview’ button we previously used in Google Tag Manager’s interface.
Creating Custom Definitons in Google Analytics 4
As we see in the Google Analytics Realtime our GA4 IPAddress Event succesfully fired. However, Realtime reporting is only limited to the immediate monitoring of events and activities as they happen within 30 minutes. This means that after 30 minutes the events that we see getting fired will disappear from the Realtime but still added to the general reports. However, the event parameter {{IPAddress}} that we’ve added to the IP Address GA4 Event will disappear forever. As a result, in the usual GA4 Event Reports we’ll not see any IP Address data that is unless we create a custom dimension for it in the Custom Definitions in Google Analytics 4. If we create a custom dimension for it, the data in IPAddress parameter will not disappear.
In Google Analytics 4, Custom Definitions enable us to create custom dimensions and metrics, expanding our ability to collect and analyze data beyond the default standard dimensions and metrics. This means that our IP Address data will appear in the standard reports in GA4 only if we create a custom dimension for it.
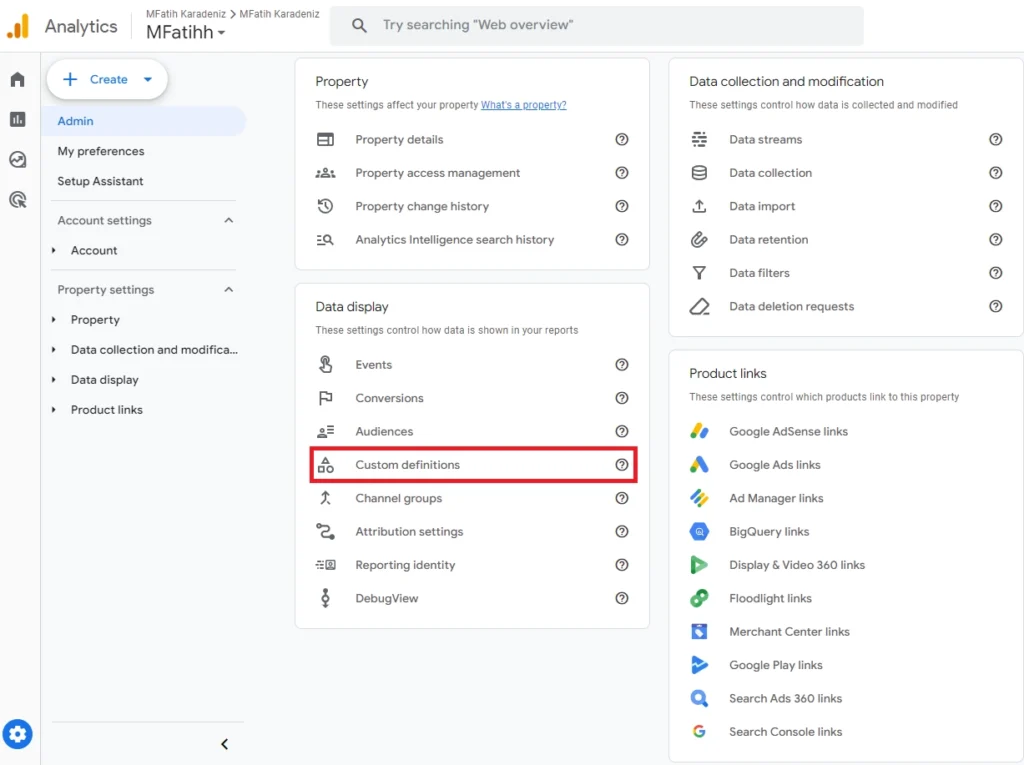
To create a Custom Dimension in GA4:
- Navigate to the Google Analytics 4
- Click ‘Admin’ in the left bottom
- Choose
 ‘Custom definitions’ located under Data display
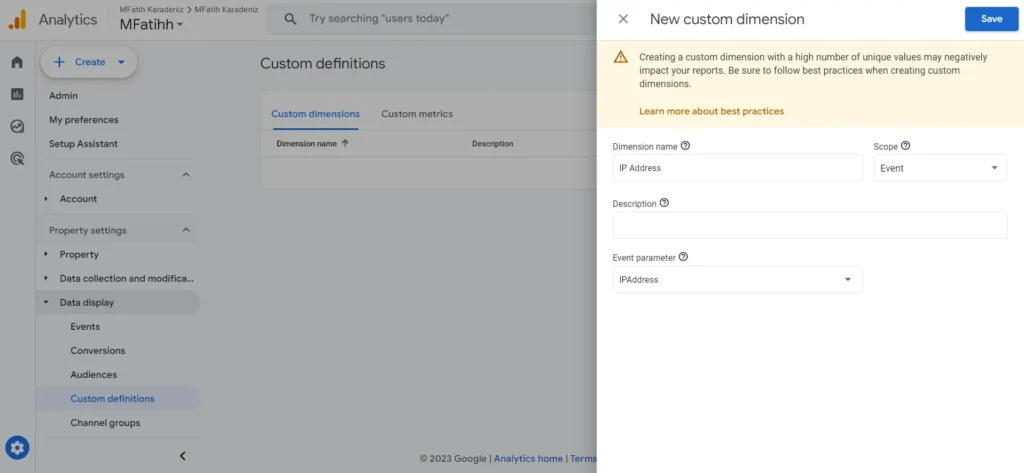
 - Click ‘Create custom dimension’ to create new custom dimesion
- Paste ‘IP Address’ for the Dimension name
- Write ‘IPAddress’ for the Event Parameter
- Save.
 ‘Custom definitions’ located under Data display
We’ve now succesfully created a custom dimension for our IPAddress event parameter. This means that it will now be possible for us to view IP Address Data for all of the GA4 Events to which we’ve added ‘IPAddress’ as an Event Parameter.
In this article we’ve added the ‘IPAddress’ event parameter to the IP Address GA4 Event we’ve created. However, creating a GA4 Event just for IP Address is optional. If you were to implement the same Custom Event trigger which we created under the ‘IP Address GA4 Event’ to any GA4 event of yours and provided that ‘IPAddress’ event parameter is also added to any of the GA4 Event Tag, then you’d still see IP Address data in such events.

Viewing IP Address Data on Standard Google Analytics 4 Reports
It is very significant to mention that you can view the data on the GA4 Events you’ve added the ‘IPAddress’ Parameter of in the GA4: Reports > Reports Snapshot > Engagement > Events. From here you can see the all of the events but for the IP Address event and its parameter it might take up to 24 hours to appear in the events section.
After waiting for some time, we can access the event we’ve added the GA4 event ‘IPAddressEvent.’ We’ll click on that, and on the new page, we can view the IP Address data as a custom parameter.
However, if you have just implemented this setup you may have to wait for about a day after for the data to appear in this particular section. This is because the data that appear here will take some time unlike the Realtime Report where it appears almost immediately. After some time passes you can view the relevant data in this section of your Google Analytics 4 property.

Collecting IP Addresses without Creating a specific IPAddress Event
If you seek to collect IP Address data without creating an event which is specific to it, then you can prefer to use this follow this method. In this approach we’ll be adding a custom javascript variable that returns IP Address of the user.
To do this follow these steps:
- Navigate to Google Tag Manager and go to “Variables.”
- Click on ‘New’ under User-Defined Variables.
- Name the variable as “IPAddress” and select “Variable Configuration.”
- Under Page Variables, opt for “Custom JavaScript” and insert the code below and save:
function() {
  var xhr = new XMLHttpRequest();
  xhr.open('GET', 'https://api64.ipify.org?format=json', false);
  xhr.send();

  if (xhr.status === 200) {
    var response = JSON.parse(xhr.responseText);
    return response.ip;
  } else {
    return 'Error';
  }
}
Now, this custom variable is configured to retrieve the visitor’s IP Address. You can add this custom JavaScript variable as an event parameter in any GA4 Event you’ve previously set up. Additionally, ensure that you add this as a custom dimension, following the same procedure described earlier in creating Custom Definitions. This ensures that your IP Address data does not disappear in the standard GA4 Reports.
If you prefer this method you will not have to create a specific IPAddress event but you can gather IP Address data on an already existing event.
The Advantages IP Address Data Collection
Collecting IP addresses can offer valuable insights into user behavior and enhance the overall analytics of your website. While it’s crucial to approach this practice with respect for user privacy and legal compliance, understanding the benefits can help you make informed decisions about data collection.
- Geolocation Analysis:
- Insight into Visitor Locations: IP addresses can provide information about the geographical location of your website visitors. This data is particularly useful for businesses targeting specific regions or tailoring content based on user location.
- Enhanced User Experience:
- Personalized Content: Knowing the general location of your users allows you to personalize content based on regional preferences or provide localized promotions. This can significantly improve the user experience and engagement on your site.
- Security and Fraud Prevention:
- Identifying Suspicious Activity: Monitoring IP addresses can aid in identifying potentially malicious or suspicious activities, such as multiple login attempts from different locations. This information is valuable for enhancing the security of your website and protecting user accounts.
- Analytics Accuracy:
- Refining Analytics Data: Understanding the geographical distribution of your audience can refine your analytics data. It helps in distinguishing between local and international traffic, providing more accurate insights into user demographics.
- Marketing and Advertising Strategies:
- Targeted Campaigns: Geolocation data derived from IP addresses can inform targeted marketing campaigns. You can tailor advertisements or promotions based on the location of your audience, making your marketing strategies more effective.
- Preventing Account Abuse:
- User Account Management: Tracking IP addresses can be instrumental in detecting and preventing account abuse, such as unauthorized access or misuse. It further helps in identifying patterns associated with fraudulent activities, such as multiple account creation attempts from the same location or unusual login patterns. It adds an additional layer of security to your user accounts.
Conclusion
In summary, this tutorial has walked through the step-by-step process of setting up a tagging solution to collect IP addresses using Google Tag Manager and integrating the data into Google Analytics 4 Reports. It’s crucial to approach this with a strong awareness of legal and ethical considerations, emphasizing the need for explicit user consent and compliance with privacy laws. The tutorial covers the configuration of tags, triggers, and custom dimensions, providing insights into the advantages of IP address data collection, including geolocation analysis, improved user experience, enhanced security measures, and more targeted marketing strategies.
In implementing these practices, website owners gain valuable insights into user behavior while ensuring responsible and privacy-conscious data collection. By striking a balance between the benefits and privacy considerations, this tutorial equips users with the tools to enhance their website analytics while respecting user privacy rights.

Yapısal Veri Test Aracı
Automate Technical SEO Audit With Google Apps Script
